
Before

After
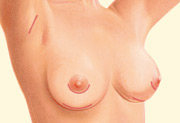
Description: Breast augmentation and peri-areolar mastopexy (lift) Before and after pictures

Before

After
Description: Breast augmentation and peri-areolar mastopexy (lift) Before and after pictures
Case Details
This 23 year old came to see Dr. Medalie in his Beachwood office. She was interested in a breast augmentation and lift to decrease the size and protrusion of her areolae and increase the superior fullness of her breasts. She had an element of tubular breast disorder and was interested in a rounder, fuller appearance. After careful consultation she decided to proceed with 330 cc silicone breast implants at the same time as a peri-areolar mastopexy and lift. The surgery was performed as an outpatient and took approximately 2.0 hours. She is shown 3 months after the procedure and is very happy with her higher and fuller breasts as well as her smaller areolae. *Plastic Surgery results may vary
A breast augmentation procedure includes the following steps:
Step 1 – Anesthesia
Medications are administered for your comfort during the surgical procedure. Dr. Medalie prefers light general anesthesia with the patient breathing fully on her own.
Step 2 – The Incision
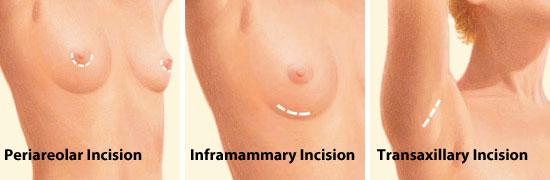
Incisions are made in inconspicuous areas to minimize visible scarring.We will discuss which incision options are appropriate for your desired outcome. Incision options include: along the areolar edge (peri-areolar incision), the fold under the breast (inframammary fold) and in the armpit (axillary incision). I prefer the IM fold approach because recent literature suggests that it is associated with a lower incidence of capsular contracture. Ths incision for a silicone implant is by necessity larger than one for a saline implant because the silicone implant is pre-filled and the saline implant starts empty.
Incisions vary based on the type of breast implant, degree of enlargement desired, your particular anatomy and patient-surgeon preference.
Step 3 – Inserting And Placing The Breast Implant
After the incision is made, a breast implant is inserted into a pocket either:
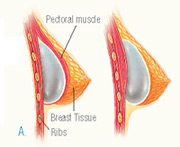
A. Under the pectoral muscle (a submuscular placement)
B. Directly behind the breast tissue, over the pectoral muscle (a submammary/ subglandular placement)
C. Dual-plane which is partly under the muscle (in the upper pole) and partly under the breast (lower pole). This procedure is more frequently used in women who have had children and have some droop to their breasts.
The method for inserting and positioning breast implants depends on the type of implant, degree of enlargement desired, your body type and your surgeon’s recommendations.
Step 4 – Closing The Incisions
Incisions are closed with layered sutures (that dissolve) in the breast tissue and with sutures, skin adhesive and surgical tape to close the skin.
Over time the incision lines will fade. The quality of scar depends on many things, including your genetics, exposure of your body to nicotine and infection.
Step 5 – See The Results
The results of breast augmentation are immediately visible. Typically they start high and then over time settle to a lower and more natural appearance. I usually tell patients that what they see is not what they get until 3 months after the surgery.
*Plastic surgery results can vary from patient to patient and are not guaranteed
Below is information from the American Society of Plastic Surgery regarding breast lift surgery:
Your breast lift procedure can be achieved through a variety of incision patterns and techniques.
The appropriate technique for you will be determined based on:
- Breast size and shape
- The size and position of your areolas
- The degree of breast sagging
- Skin quality and elasticity as well as the amount of extra skin
Step 1 – Anesthesia
Medications are administered for your comfort during the surgical procedure. The choices include intravenous sedation and general anesthesia. Your doctor will recommend the best choice for you.
Step 2 – The Incision
There are three common incision patterns:
Around The Areola

Around The Areola And Vertically Down From The Areola To The Breast Crease

Around The Areola, Vertically Down From The Breast Crease And Horizontally Along The Breast Crease

Step 3 – Reshaping Your Breasts
After your doctor makes the incisions:
- The underlying breast tissue is lifted and reshaped to improve breast contour and firmness.
- The nipple and areola are repositioned to a natural, more youthful height.
- If necessary, enlarged areolas are reduced by excising skin at the perimeter.
- Excess breast skin is removed to compensate for a loss of elasticity.
- Breast augmentation may also be performed to add more volume and provide superior fullness (this was done in the patient case presented above)
Step 4 – Closing The Incisions
After your breasts are reshaped and excess skin is removed, the remaining skin is tightened as the incisions are closed.
Some incision lines resulting from breast lift are concealed in the natural breast contours; however, others are visible on the breast surface. Incision lines are permanent, but in most cases will fade and significantly improve over time.
Many women desire the smallest scar possible. However, your plastic surgeon will recommend the incisions which best suit your anatomy.
Listen to your surgeon and do not diminish your result by demanding an incision that will not be appropriate for you.
Sutures are layered deep within the breast tissue to create and support the newly shaped breasts. Sutures, skin adhesives and/or surgical tape may be used to close the skin.


